Google Maps - Getting Started
Google Maps is a map service that you view in your web browser. Depending on your location, you can view basic or custom maps and local business information, including business locations, contact information, and driving directions. Click and drag maps to view adjacent sections immediately. View satellite image with or without map data of your desired location that you can zoom and pan. Best of all, Google Maps is an online application, so there's no downloading required, and you can access it from any computer that's connected to the Internet.
- You can view Google Maps one of several ways:
- Get familiar with the Google Maps interface and earn how to use the navigation controls.
- Watch the Google Maps tour.
- Ready to create your own map?
- Add placemarks and lines to your map.
The following diagram describes some of the features available in Google Maps. Not all features may be available in your location:
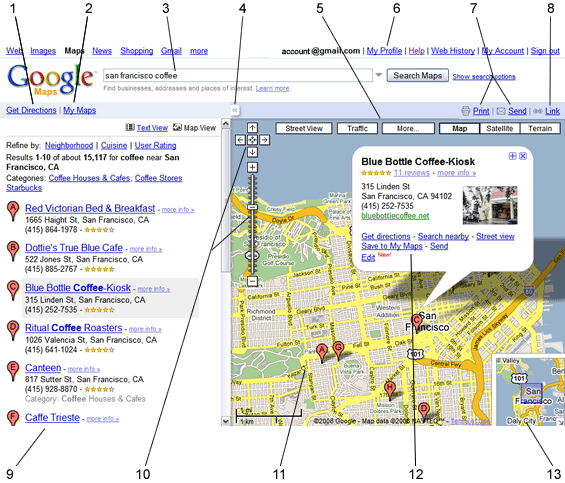
- Get directions - Click this to get directions.
- My Maps - Use this to view and create custom maps.
- Search - Use this to search for places and businesses. Click the grey button to the right of the seach box to use, view or edit your saved locations.
- Left panel - Click this to hide or show the left panel.
- Views - Click these to display different views, including aerial images and street level imagery.
- My Profile - Click this to create and edit a profile that is visible to other Google Maps users.
- Print/Send - Click these to print or send maps .
- Link to this page - Click this to create a map web address (URL) in your browser that you can share with others. Learn more.
- Search results - This panel shows search results. Click any result to view more information.
- Navigation controls - Use this to navigate.
- Map - This area displays the map, search results, My Maps and much more.
- Info window - This window displays additional information when you click a marker or search result.
- Overview map - This view shows the location of current map view.
Navigating in Google Maps
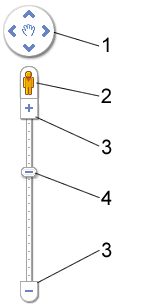
You can navigate (move your view) in two dimensions in any Google Map. To pan (move the map), do one of the following:
- Click and drag the map
- Press the up arrow on your keyboard to move north
- Press the down arrow on your keyboard to move south
- Press the right arrow on your keyboard to move east
- Press the left arrow on your keyboard to move west
Additionally, you can zoom in or out pressing the + or - keys. Move the cursor over a location and use the mouse scroll button to zoom in or out on that location. To center and zoom in on a location, double click the location.
Using the Navigation Controls
About the Left Panel
The left panel shows search results, My Maps and additional information about items on the map. To hide this panel, click  on the border of this panel. To display a hidden left panel, click
  .
.
About Markers
Markers appear in Google Maps to signify an important location. For example, when you search for an address, Google Maps shows you the address location with a marker. Types of markers include:
You can see other custom markers in Google Maps that others have created or even create your own (learn more).
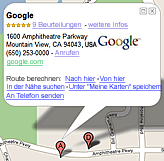
Viewing Info Windows
 |
|
Info windows appear when you click a marker and display additional information about the location. To view the info window for a marker, do one of the following:
- Click the marker
- Click the marker in the Search results tab
- Click the appropriate link in the Search results tab
Info windows can contain great information such as photos of businesses, descriptions, restaurant reviews, links to driving directions and much more. You can expand some info windows to display even more information. In certain locations, you can view and navigate street-level imagery by clicking Street view in the info window (learn more).
If available, click  or more info>> in an info window to expand it. To close an info window, click or more info>> in an info window to expand it. To close an info window, click  . To resize an expanded info window, click . To resize an expanded info window, click  . Note that you can create your own review of businesses by clicking Write a review. . Note that you can create your own review of businesses by clicking Write a review.
|
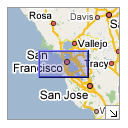
Using the Overview Map
 |
|
The overview map (shown left here) appears in the bottom right corner of the map. It helps orient you by showing the location of current map view in the context of a larger geographical area. The area currently displayed in the map is show as a purple box in the overview map. At any time, click  to hide the overview map or click to hide the overview map or click  to display it again. to display it again.
As you pan or zoom in the map, the overview map view changes accordingly. You can change the existing view in the map by doing one of the following:
- Drag and drop the purple box in the overview map.
- Drag and drop the area outside the purple box to pan the map.
|
Choosing a Default Location
The default view that Google Maps displays is determined by your location. However, if you'd like to use a different location, enter an appropriate address in the search box and click Search Maps. You can also use one of your saved locations. Once your address appears, click Make this my default location in the information window. Thereafter, this address appears as the default location.
Getting More Help
In addition to this user guide, Google offers a number of resources that can help you use and enjoy Google Maps. These include:
- Google Maps Help Center - Use the Help Center at any time to find additional information.
- Troubleshooting - View information that specifically pertains to troubleshooting issues with Google Maps.
- Google Maps Help Group - Learn from other Google Maps users by asking questions and sharing answers.
- Google Maps API - Use this to put Google Maps on your own web site
- Google Maps API Blog - This blog describes how you can use some of the interesting features of the Google Maps API.
5 Cool and Easy Things You Can Do in Google Maps
Ready to explore Google Maps? Try any of the following:
- Create your own map. With My Maps, you can mark locations, paths, and regions of interest on a personalized map, and share it with your students! You can even add descriptive text, embed photos and videos, and view your map on Google Earth.
- Plan an event and distribute information to parents and teachers.
- Generate a map locating your school and all of the other schools in your district.
- Create a map for parents who are volunteering to drive on the next field trip.
- Have your students create a map that shows how they get to school and have students compare routes. If you want to delve a bit deeper, have students compare the environmental impact of different modes of transportation. Check out the UK Carbon Footprint Project for lesson plan suggestions.
Comments (0)
You don't have permission to comment on this page.